Description
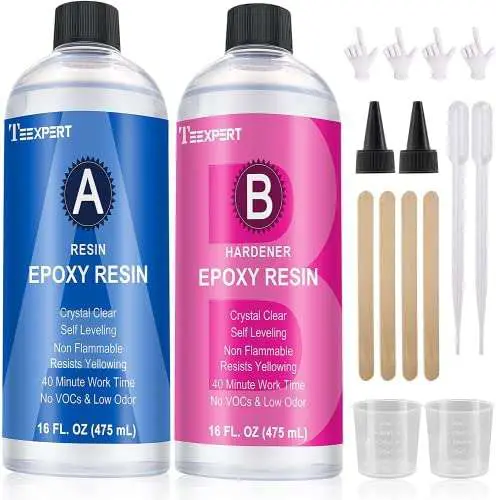
The included 32oz epoxy resin and hardener kit is the ultimate adhesive for your jewelry crafting needs. Includes the hardener, one 2.5mm mixed-size lid, three 1.8mm mixed-size lids and two 1.6mm mixed-size lids as well as a tinted epoxy jar to help you achieve your desired tone before finishing off with crystal clear finishes or paints with acrylics like oxides or enamels depending on what you are looking to create.
This is the ultimate adhesive for your jewelry crafting needs. Includes the hardener, one 2.5mm mixed-size lid, three 1.8mm mixed-size lids and two 1.6mm mixed-size lids as well as a tinted epoxy jar to help you achieve your desired tone before finishing off with crystal clear finishes or paints with acrylics like oxides or enamels depending on what you are looking to create. Get creative and challenge yourself to use this everyday epoxy resin to make something beautiful. Make sure to check out all of our products for more great deals.
Product Description


Hard As Rock
Teexpert epoxy resin after curing will hard as rock ,which the hardness after curing is 90HV+.
Non-Yellowing
Teexpert epoxy resin offers non-yellowing protection. Its advanced stabilization additives provide superior, long-term clarity.
Self Leveling
Teexpert self leveling for epoxy resin is a great design,it can take less time for resin art.
Self Degassing
Teexpert resin epoxy are also support self degassing.After stirring, wait a few minutes for the bubbles to disappear automatically
Read more

Step 1
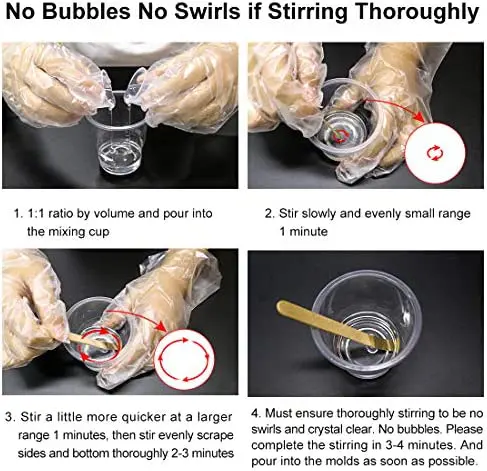
Measure 1:1 by volume.

Step 2
Pour resin and pigment or mica powder together into a mix cup.

Step 3
Mix slowly until absolutely no swirls are seen, scrape sides and bottom thoroughly.The more slowly stir, the less bubbles appear.(Time:3-4 minutes).

Step 4
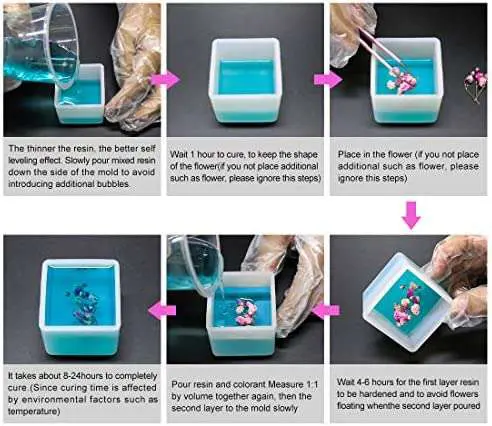
The thin the resin, the better self equal effect. Slowly pour mixed resin down the side of the resin mold silicone to avoid introducing additional bubbles.


Step 5
Wait 1 hour to cure,then place in the flower (if you not place additional such as flower, please ignore this steps).

Step 6
Wait 4-6 hours, the first layer rein has hard, to avoid the flowers float when the second layer poured(if you not place additional such as flower, please ignore this steps).

Step 7
Repeat 1-3 steps,Pour the second layer to the mold slowly, the reason of this steps is avoid the additional float(if you not place additional such as flower, please ignore this steps).

Step 8
Allow to cure for 24 hours(heat and mass will dictate the amount of cure time required – the bigger the mass the faster it will cure, as well as the warmer the air temperature the faster it will cure – Note: thin areas take longer to cure).


 HOW TO AVOID STICKY OR SOFT RESIN
1.The biggest culprit is usually off-ratio measuring,It’s important to measure the resin and hardener 1:1 ratio.
2.Stirring around and around, purposefully, as well as from side to side. Scrape the walls and the bottom of the cup a couple of times during mixing to release unmixed resin too. Then stir that through as well!
3.Epoxy Resin hates moisture, so working in very humid conditions or adding things to the epoxy resin that contain moisture will stop the resin from curing properly.
4.When you’re colouring epoxy resin with dyes and pigments, add no more than 10% of the total resin volume. The less you add, the better.
5.It’s best to stick with dyes and pigments that are designed specifically for resin,But some of pigment or dye that aren’t designed for resin will prevent the resin from curing properly.
5 SIMPLE WAYS TO ACHIEVE BUBBLE FREE
1.Stir slowly in one direction to avoid bubbles, which are very easy to produce if you stir too fast.
2.Put the mixed resin and hardener into hot water at about 60 degrees to accelerate the bubbles coming out.
3.Use the heating coaster (around 60 degrees) to accelerate the bubbles out, which is very convenient to operate.
4.Use lighter or heat gun to heat the resin surface to eliminate air bubbles.
5.If you’re using silicone molds you can warm the mold in the oven before pouring the resin in it. Take the mold out of the oven, let it air for a few seconds and then pour the resin in. The warmth of the mold will get rid of the bubbles in the resin.


 Fast curing machine Teexpert 32oz epoxy resin Teexpert 1 gallon epoxy resin 16oz beginner 16oz upgrade formula 64oz epoxy resin Crystral Clear ✓ ✓ ✓ ✓ ✓ Hard As Rock ✓ ✓ ✓ ✓ ✓ UV Resistance ✓ ✓ ✓ BEST ✓ High Gloss ✓ ✓ ✓ ✓ ✓ Self leveling ✓ ✓ ✓ ✓ ✓ Fast Curling 2 Hours fast curing ✓ ✓ ✓ ✓ ✓ Accessories Included 3 tray,1 silicone circle 4pcs Sticks, 2pcs Graduated Cups, 2 Pairs Gloves,1 Instructions 2 Sticks, 2 Plastic Spreader, 2 Graduated Cups, 4 Pairs Gloves and 1 Instructions 16 fl.oz 474ml Resin set , Resin Pigments*6, Silicone Coasters molds*4, Measuring Cups 30ml*2, Disposable, Mixing Cups*10, Mixing Sticks*6, Gilding Flakes, Disposable, Gloves*10, Droppers*6, Tweezers, Silicone Sticks, Mica Powder*3 4pcs Sticks, 2pcs Graduated Cups, 2 Pairs Gloves,1 Instructions 10*gloves,1 instruction Scratch Resistant ✓ ✓ ✓ ✓ ✓ ✓ Water Resistant ✓ ✓ ✓ ✓ ✓ ✓ Heat Resistant up to 95C° ✓ ✓ ✓ ✓ ✓ ✓







 HOW TO AVOID STICKY OR SOFT RESIN



cn43idaho –
This is the first time I used anything like this. I made a wooden frame around a knife blank I made and poured it full around the handle. I used gel food coloring to dye it red. I trimmed the resin with a band saw then sanded it.
carolb12 –
Great value.
Binkyrae –
I was worried about yellowness or bubbles but this product seems to work for me a little Heat or alcohol spray pulls out 98% of the bubbles and so far none of my projects have yellowed
C. Posey –
Mixes well and quickly. Cures with a glassy clear finish!
Eric Ledesma –
The product leaked in shipping, so quite a mess to clean up. However, that certainly has nothing to do with the effectiveness of the product itself. I used as directed and got exactly what I wanted.
Draigathar –
I am fairly new with resin crafts but this is a great resin to use. Easy pour and minimal air bubbles if you remember to stir slow. Mixes well with all kinds of powder or ink. Very happy and will purchase again!
Julie Boone –
Good quality worth the money
Amazon Customer –
Received quickly, good product, good price
Rayna Low –
This epoxy was easily mixed and I also added glitter so I could coat the bottom on my tumbler. It sealed beautifully to the bottom. I wish I took a photo but forgot. I had no bubbles and I used the ratio of 1:1 and stirred for about 4 minutes.
Tina F –
This Epoxy is easy to use with low odor. I was a repeat customer.